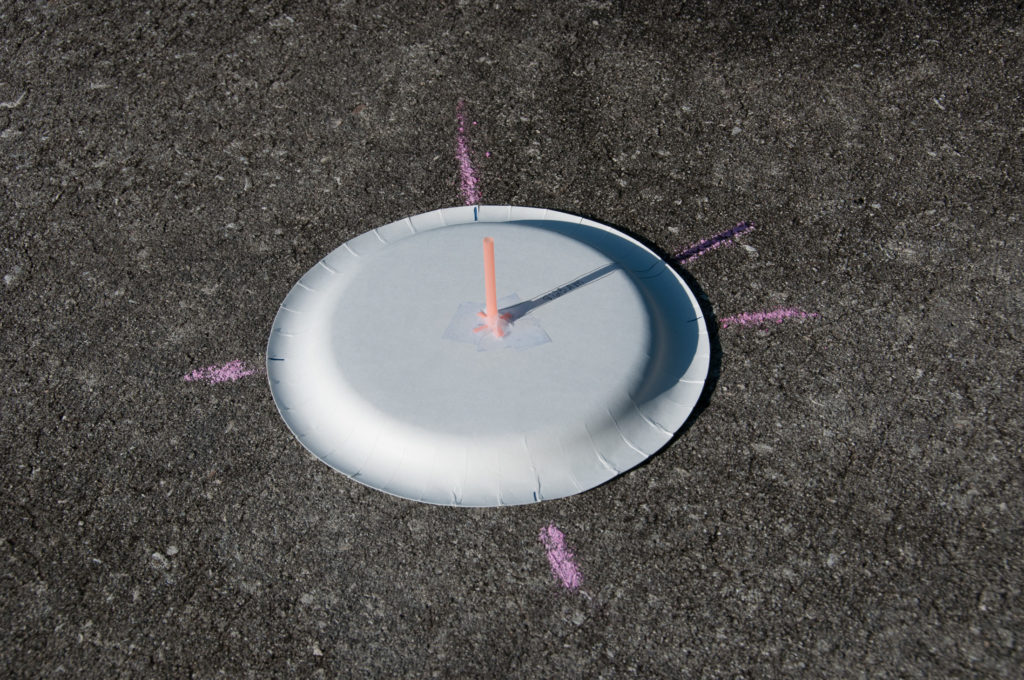
Paper Plate Sundial
Materials
- Paper plate, 9 in. white
- Plastic drinking straw
- Pencil or marker
- Ruler
- Scissors
- Tape
- Compass
- Watch or clock
Procedure
- Find the center of the paper plate and mark it with an X. (Note: folding the plate in half going in both directions can help you do this easily).
- Make four, 1/2-inch cuts lengthwise in one end of the straw. These should be spaced evenly apart, not all together. Flare out the cut pieces and tape the four ends to the plate centered over the X that you have drawn. The straw should stick straight up from the center of the paper plate.
- Measure and cut the straw to a height of 2 inches. This is the gnomon, the part of a sundial that casts the shadow to tell the time.
- Marking the hours on your sundial (Day 1)
- Take the sundial outside at 12:00 noon and place in a location that will be sunny during the whole day. Tape or weigh the sundial down so that it won’t blow away.
- With the compass, find out what direction is north and mark it on your sundial. This is so that you can point your sundial in the same direction every time you use it.
- Trace the shadow of the gnomon and mark it 12:00.
- At each hour, trace the shadow of the gnomon on the plate and label what time it is until the sun sets.
- Marking the hours on your sundial (Day 2)
- If you moved your sundial since the last time you worked on it, use the compass to find north, and set your sundial so that your north mark is pointing in that direction.
- Continue to make hourly marks until noon (where you started before).
- Your sundial is now complete, and can be used to tell the time!
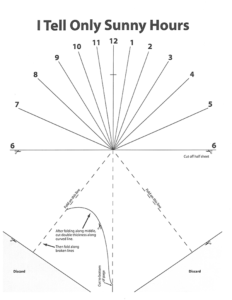
“I Tell Only The Sunny Hours” Sundial
Materials
- Sundial pattern
- Scissors
- Tape
- Compass
Procedure
- Cut the paper along the marked line. The top half will serve as the base and the bottom half will be used to construct the gnomon.
- In the gnomon part, cut away the two marked corners.
- Fold the gnomon at the broken line in its middle, to get paper of double thickness with the printing on the outside. The line of the fold is the gnomon.
- Cut out along the curved line, cutting a double thickness of paper in one cut, stopping at the broken line (do not cut the piece all the way off).
- Fold the gnomon sheet in the opposite direction, at the other two broken lines (back up on itself so that the gnomon and the cut curved line are temporarily sandwiched in between these two ‘wings’). Open these up to a 90-degree angle to form the base for the gnomon to stand upright.
- In step 4, the fin of the gnomon was separated from two pieces with curved outlines. Fold those pieces so that thy too are flat on the table. One goes above the other and the two hook together around the bottom of the gnomon.
- On the base sheet, carefully cut from the apex (the point where all the hour lines meet) along the middle line up to the small cross line marked on it. Do not cut any further.
- Slide the fin into the cut you made, so that all the horizontal parts of the gnomon sheet are below the base sheet; only the fin should stick out through the slit. Make sure that the gnomon is exactly perpendicular to the base. On the underside, tape the gnomon sheet to the base sheet.
- To use, orient the gnomon to point north. The shadow of the straight edge of the fin now tells time.
Note: Sundial pattern used with permission from Dr. David P. Stern, “From Stargazers to Starships.”