A solar cooker is a type of solar thermal collector. It “gathers” and traps the Sun’s thermal (heat) energy. Heat is produced when high frequency light (visible and ultraviolet) is converted into low frequency infrared radiation. Ultraviolet and visible light easily pass through glass, however when they strike a darkened surface they are converted into long wave infrared radiation (heat). The glass (called glazing on a solar collector) traps these long waves. For example, on a sunny day, your car with the windows rolled up becomes a solar collector. The glass lets in the Sun’s energy, traps the thermal energy, and the air inside your car becomes hot. As more light enters the car, the air gets even hotter, until we say that it feels like an oven inside!
Solar cookers are improving the quality of life for many people around the world. Solar ovens have been introduced in parts of South America, Africa, and India. In these areas, it is typical for a woman to spend nearly half her workday looking for and collecting firewood. Also, respiratory problems in the children of these areas have been linked to fumes created by the burning of poor quality wood. The use of solar cookers helps to reduce the dependency on firewood. In addition, some women have turned their talents for building cookers into businesses, by building and selling cookers for added income.
Besides cooking, solar ovens can be used to purify water. This is beneficial for areas where obtaining safe drinking water is a problem.
There are three basic types of solar cookers on the market today: box, parabolic reflector and panel cookers.
Box Cookers
Box cookers (also known as box ovens) can cook the same foods you would cook in a standard oven or a slow cooker. As the name suggests, they have an interior chamber (“box”), although it does not have to be square shaped. They use reflectors to concentrate more sunlight into the box, glazing to allow sunlight into the box and then trap the heat, and insulation to retain as much heat as possible. Commercially made box ovens can reach 400o on a clear sunny day. Box ovens can be easily made from inexpensive or recycled materials, and are suitable for classroom construction and cooking.
File Box Cooker
Materials
- File storage box, or other box approx. 12″ x 15″ x 10″
- Foil backed foam insulation board, approx. 1/2 sheet per oven
- Plexiglass, pre-cut to 12″ x 15″
- Aluminum duct tape, 20 feet
- Black construction paper, 12″ x 15″
- Aluminum foil, 18″ x 21″
- Scissors
- Wooden dowel, stick or pencil
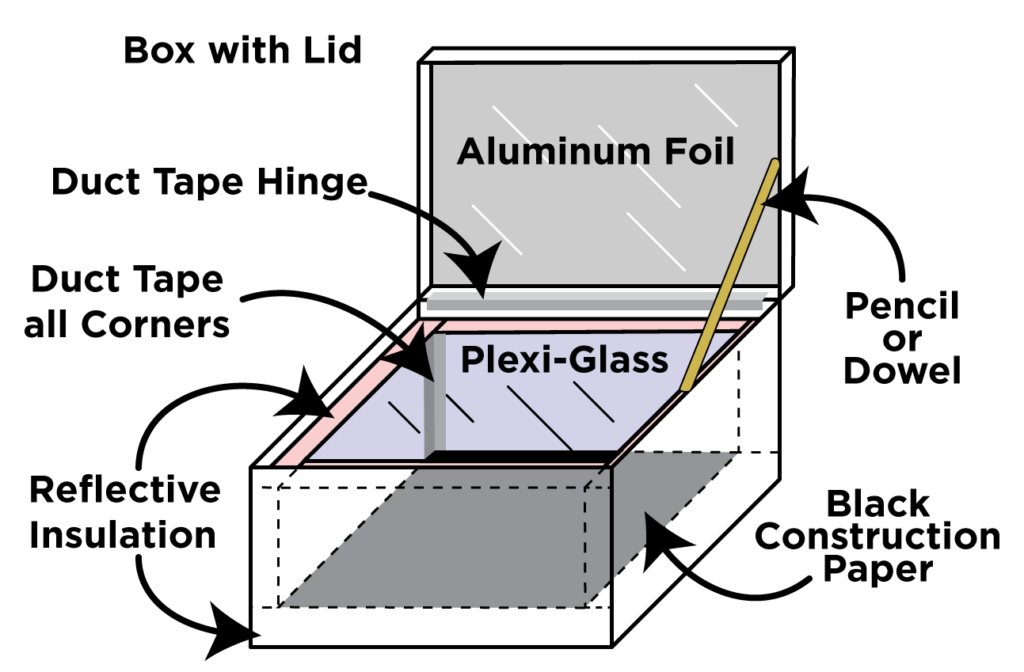
Procedure
- Cut insulation material. Each oven requires:
- (1 piece) 12″ x 15″
- (2 pieces) 12″ x 9 1/2″
- (2 pieces) 15″ x 9 1/2″
- Put a piece of insulation inside the box on the bottom
- Put pieces of insulation around all the walls of the inside of the box
- Tape all seams: bottom, sides, and around the inside top of the box
- Cover the inside of the box lid with foil for a reflector
- Cover the inside bottom of the oven with black construction paper
- Place the glazing on the top of the oven
- Attach the box lid by one long edge to the oven with an aluminum tape ‘hinge’. The rod or stick is used to adjust the tilt of this lid to capture more sunlight.
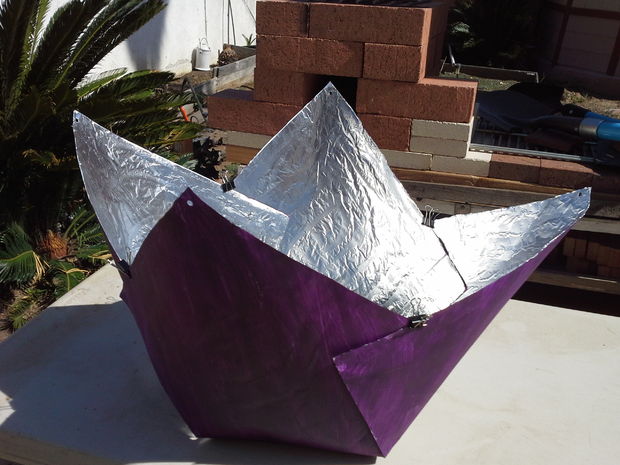
Panel Cookers
Panel cookers can cook the same foods that you would cook in a covered pot on top of the stove. They use reflectors to “gather” a larger area of sunlight and direct it towards a black cooking pot that is placed in a high temperature oven bag. The air inside the bag that surrounds the pot is the insulation that retains the heat. The temperature inside the pot of a panel cooker can reach and maintain boiling. Panel cookers can be easily made in the classroom from inexpensive materials, and are simple to use for cooking on clear sunny days.
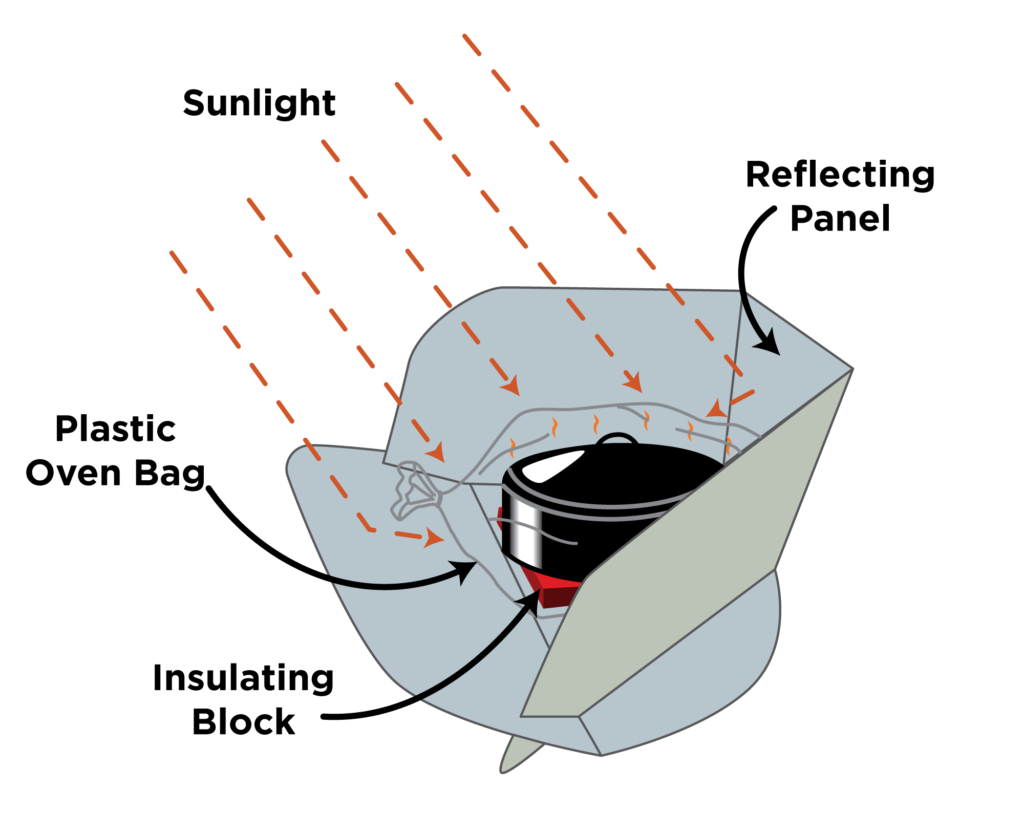
Eagle Cooker
Materials
- PDF file of template pages
- 11 Pieces of paper or card stock
- 11 Pieces of cardboard
- White glue
- 1 Roll aluminum foil
- 1 Roll duct tape
- 1 Plastic oven bag
- 1 Black cooking pot with a lid
Tools
- Scissors
- Computer Printer
This PDF file has a set of pages which are intended to be printed out and traced onto heavy cardboard. The cardboard is then cut along the traced lines and covered in foil. There are eleven sections held together with duct tape. If treated gently, an Eagle will last four or more years.
Procedure
1. Print a page out. Cut along any dotted lines (made of triangles)
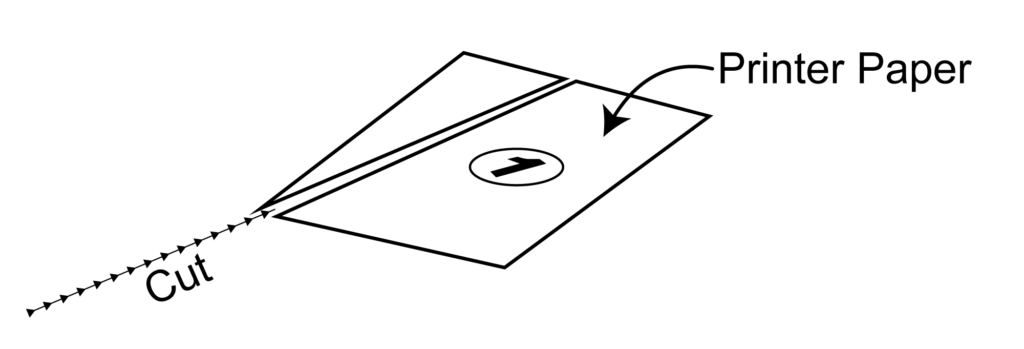
2. Use this as a pattern to cut out a piece of heavy cardboard.
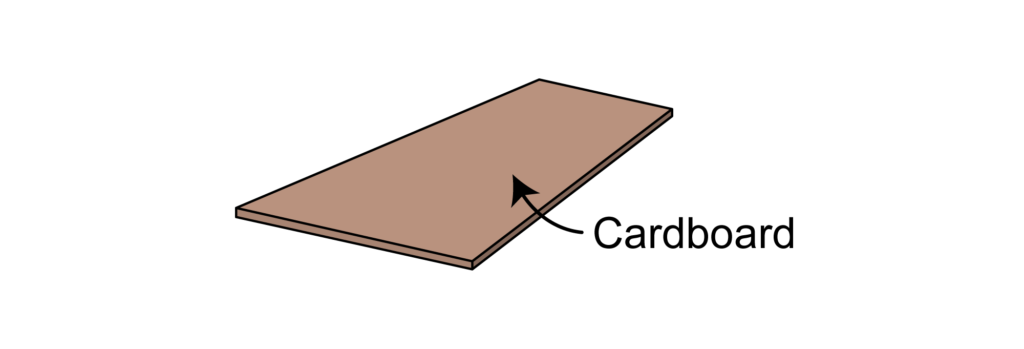
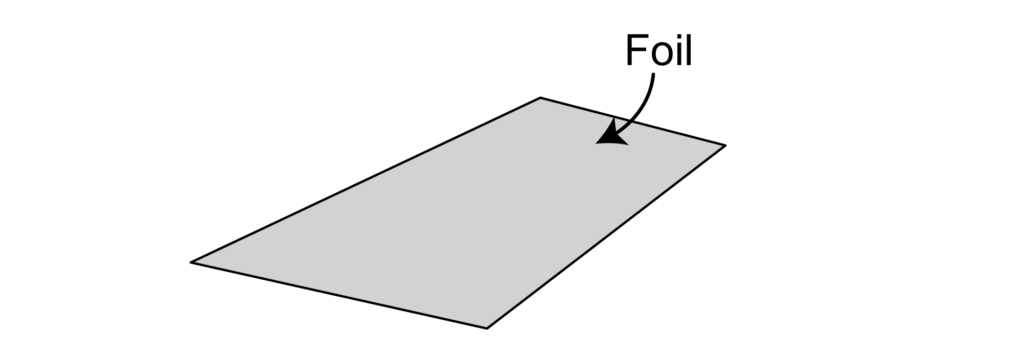
3. Cut out a piece of foil, roughly 3/4 of an inch larger than the cardboard piece.
4. Spread white glue onto the cardboard.
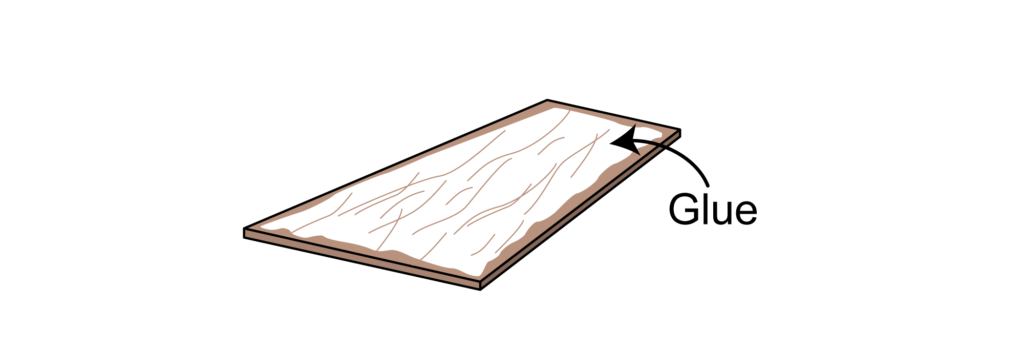
5. Glue the foil to the cardboard, shiny side out.
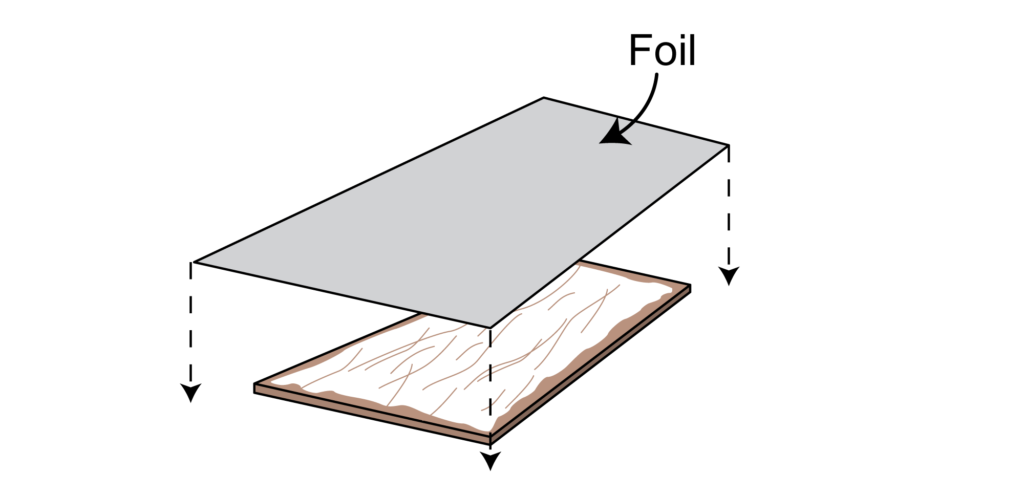
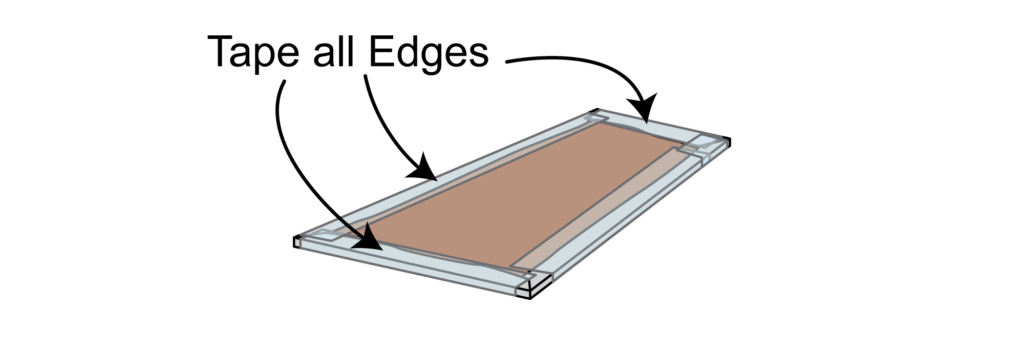
6. Smooth the foil down flat and fold the edges around the cardboard.
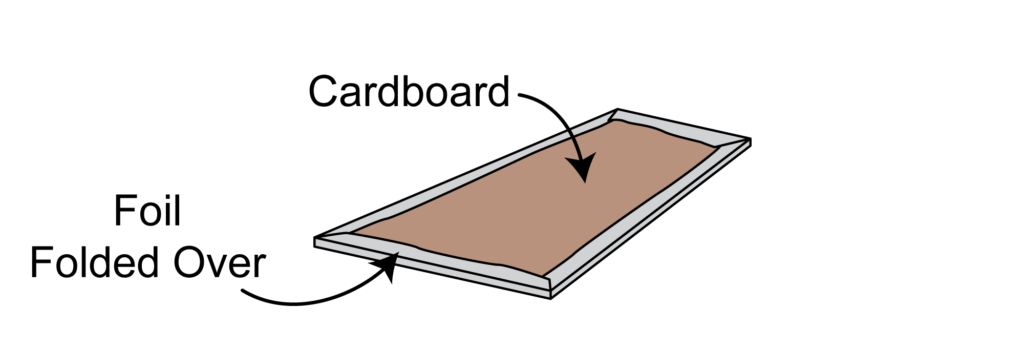
7. Wrap all of the edges with transparent packing tape.
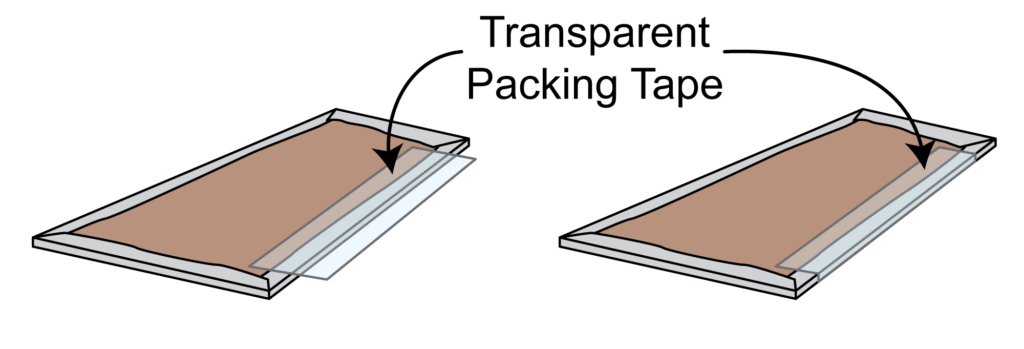
8. Good job! You’ve got ten more to go.
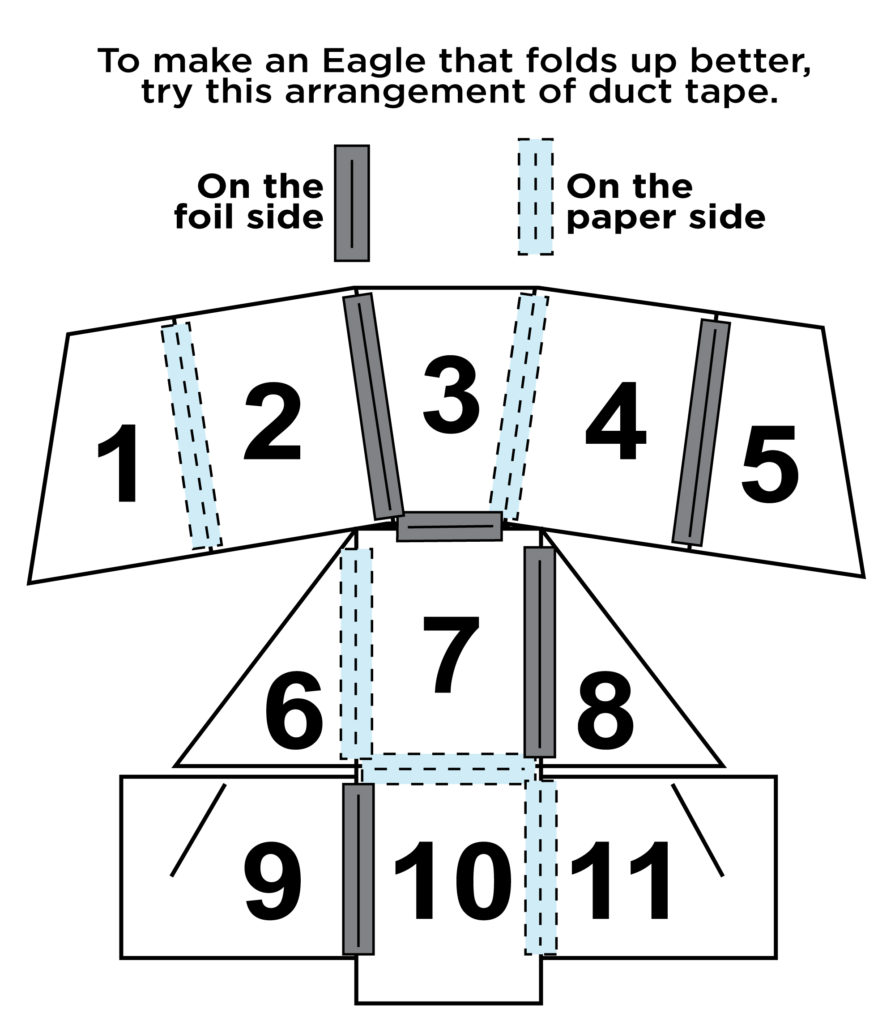
Assembling the Pieces
Copenhagen Cooker
Materials
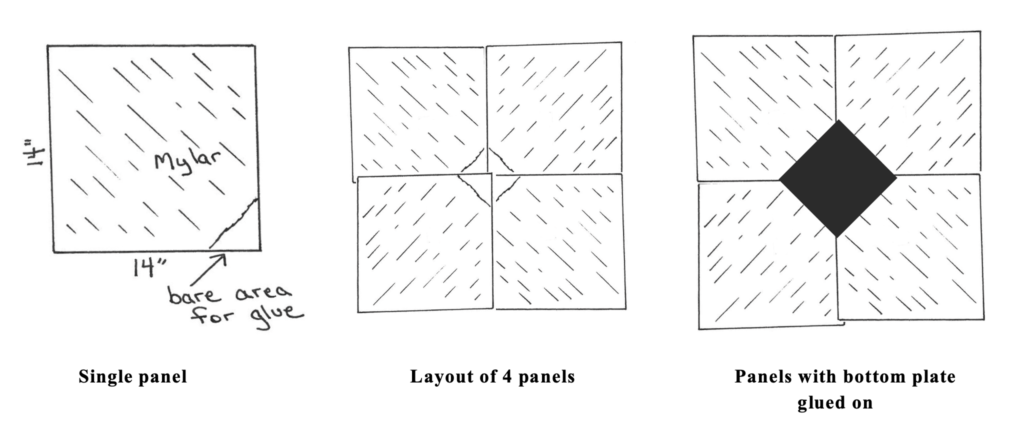
- 14″ x 14″ sheet vinyl, poster board or sheet
- cardboard (4 pieces per cooker)
- sheet mylar–available as camping ‘space’ blankets
- 8″ square 1/8″ plywood or other stiff material (an 8″ diameter metal or ceramic plate can also be used)
- glue
- sponge brushes or disposable type paint brushes
- paints to decorate outside (optional)
- black high temperature “grill” paint
- binder clips or clothespins (4 per cooker)
Procedure
- Spray paint one side of the bottom piece (plywood or heavy cardboard) with high temperature grill paint.
- Glue mylar to one side of vinyl (or poster board) leaving 3″ triangle on one corner uncovered (this is where the bottom will be glued to the panels). Work out all the bubbles to make the finish as smooth as possible. A rubber craft roller or a plastic identification card works good for this. Let dry.
- Decorate the other side of the four panels if desired.
- Lay out the four panels with the uncovered corners meeting in the middle (see diagram above). Glue the plywood bottom piece in the center. Let dry.
- When cooking, draw the four panels up and clip. The angle can be adjusted for the sun conditions.
How to cook in your Copenhagen Cooker
- Set up the cooker and place it facing the sun. For hints on setting up the cooker and adjusting the angle of the sides, check out a part of this video.
- Mix or prepare the food to be put in the cooker according to the recipe.
- Put the food in a covered black pot and put the whole dish in a high temperature baking bag. Seal tightly. Do not cover your food/pot with aluminum foil–it will reflect the sunlight away from your food.
- If you do not have a black pot, you can paint the outside of a pot or canning jar black with paint designed for barbecue grills.
- Place the pot in the center of the cooker. Draw up the sides and clip so that sunlight is reflected on the pot. Check the cooker periodically (every 20 minutes or so) to make sure it is still capturing the sunlight as the sun moves across the sky.
- When food is done, be sure to use a pot holder to remove the pot. Solar Cookers can get extremely hot!
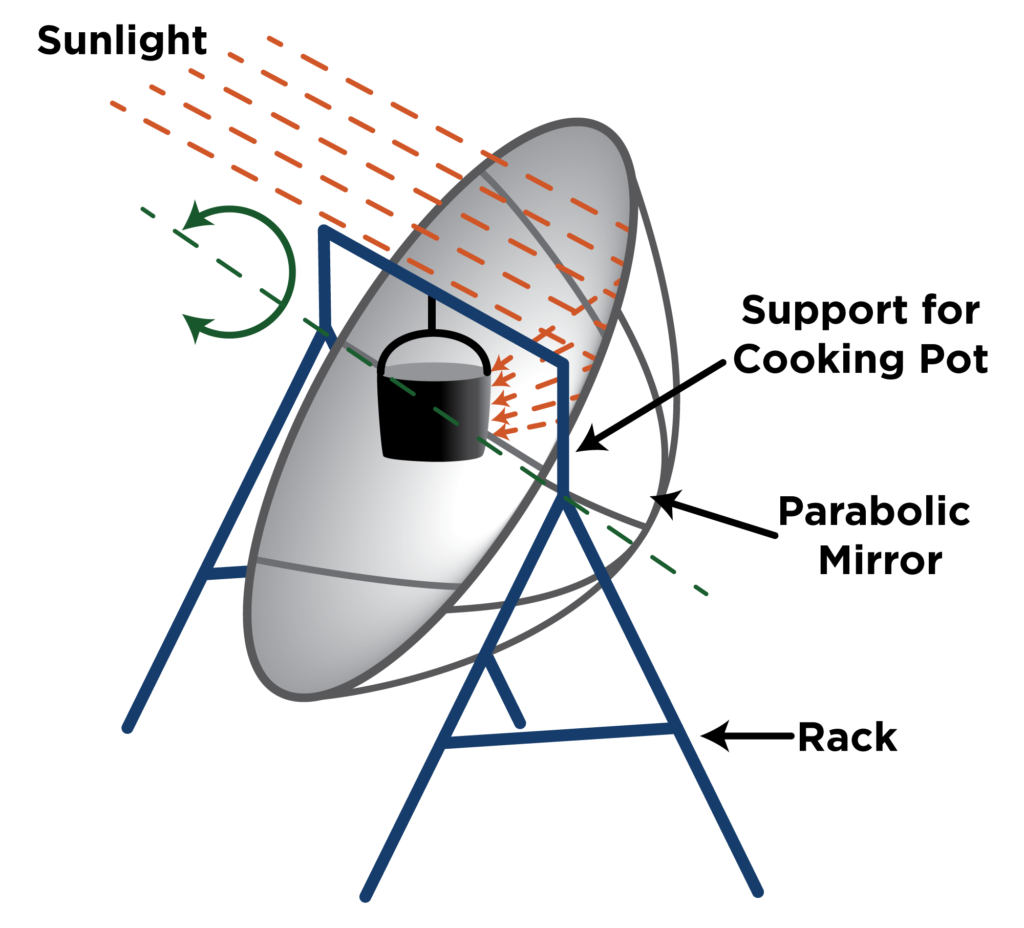
Parabolic Reflector Cookers
Parabolic cookers produce the highest temperatures, and can be used to fry or grill food; pot lids and cooking bags are not necessary. Parabolic cookers use reflectors to concentrate a large amount of sunlight into a single focal point, where the temperature can reach 500o. In the classroom, parabolic shaped cookers can be easily made from recycled satellite dishes or large umbrellas. However, the temperature can get very high at the focal point. Appropriate safety should be practiced while cooking.
Umbrella Parabolic Cooker
Materials
- large umbrella (minimum 120 cm diameter)
- mylar (from emergency “space” blanket)
- aluminum duct tape
- craft paper
- spray glue or white glue
- scissors
- hacksaw
- holder for pot (metal plant stand, small tripod, etc.)
Procedure
- Open umbrella. Using the craft paper make a template of one of the triangular sections of the inside of the umbrella.
- Using the template you made, trace enough sections onto the mylar to cover the inside of your umbrella. Cut out the sections.
- Working outdoors or in a very well ventilated area, affix one section at a time to the inside of the umbrella with the spray glue (spraying the umbrella and then placing the mylar pieces). Press out as many bubbles and creases as possible. A rubber roller or a plastic card (credit card, driver’s license, etc.) can be helpful. If you are using white glue, thin the glue until it spreads easily with a paint brush.
- Tape around the outside edges with aluminum tape.
- Tape any loose or uncovered seams between sections with aluminum tape.
- To trim the stick and handle at the focal point for the pot stand, take the umbrella outside on a sunny day. Place the umbrella on the ground and point the stick directly at the Sun. Mark the spot on the handle where the reflection of the Sun’s rays is the greatest.
- Cut the stick 3″ below your mark (shorter). This will enable you to place your pot in the focal point of the umbrella.
- When cooking, your cooker will sit on the ground facing the Sun. You may need to place something behind your cooker to keep it pointed towards the Sun.
- You want the bottom of your pot to be positioned in the focal point (3″ above the top of your stick), so the plant stand or tripod will need to sit on top of part of the cooker. Make small cuts with scissors so the legs can go through the cooker and sit firmly on the ground below.
How to cook using your parabolic cooker
- Mix or prepare the food to be put in the cooker according to the recipe.
- Position the cooker so the face of the umbrella is pointing directly at the Sun. Position your pot stand so the pot will be in the focal point. Remember, whatever is in the focal point of your cooker will get extremely hot! It is also recommended that you wear sunglasses while working with a parabolic cooker.
- Place your food in your cooking pot or pan; open frying pans may be used with parabolic cookers.
- Place the cooking pan on the pot holder. Be sure to watch your food. It can burn with a parabolic cooker.
- For extended cooking, move the cooker periodically (every 10 minutes or so) to follow the Sun as it moves across the sky.
Cooking Tips
- (Younger students will need to have parental supervision and/or help.)
- Always use lids on pans, cover tightly with plastic wrap, or use baking bags to avoid condensation on the oven glass which blocks the solar radiation.
- Temperature:
- On a clear and sunny day the oven will heat up to 250°F or above. On these days you can cook or bake anything.
- On a partially cloudy day the oven will heat to 200°F to 250°F. On these days you can easily cook meats, rice, baked potatoes, and frozen vegetables, but baking is not recommended.
- Adjust your cooking time to account for the lower temperature. A rule of thumb is to figure twice the regular cooking time.
- Use a meat thermometer instead of a timer to determine if the food is done.
- Any conventional recipe that would be suitable for your oven will work in a solar oven, also crock pot recipes are particularly suitable for using in the solar oven.
- Foods generally use less liquids or cook in their own juices. This produces better tasting and more nutritious food.
- Foods never burn and rarely overcook in a solar oven.
- Foods particularly suited for the classroom include: hot dogs, slice and bake cookies, brownies, rice mixes, cocktail sausages in barbeque sauce, nachos, s’mores.
- Some specific food tips:
- cook (steam) yellow and green vegetable in dark colored casseroles to prevent discoloration
- reduce liquids in cake recipes by one half
- cook foods in their natural state (i.e. potatoes in skins and corn in husks)
- chewy dessert recipes such as brownies come out better than crispy ones
- meats cook better if cut into small pieces.
- Simple Heat-n-Eat Ideas
- Hot dogs
- Nacho cheese sauce (can be heated in the jar with the lid removed)
- Baked beans (add hot dog pieces for beanie weenies)
- Easy-to-Bake Oven Ideas
- Slice and bake cookies
- Frozen bread dough (let rise in pan then bake)
- Frozen pizza (french bread pizza fits well)
- Packaged rice mixes
Recipes
The following recipes were student created and prepared for the Solar Energy Cook-Off as part of the annual Energy Whiz competition held at the FSEC Energy Research Center in the Spring.
Grandma’s Italian Wedding Soup
Suitable for all cookers, and sunny or partly cloudy weather conditions
1st Place Elementary Division, 2012
2 cups chicken stock
6 frozen mini meatballs
1⁄2 cup orzo
Chopped fresh basil, oregano, parsley and garlic to taste Salt and pepper to taste
20 baby spinach leaves
Mix chicken stock, meatballs, orzo, herbs and garlic together in a dutch oven or similar pot. Place pot in cooker. Simmer for 1 1⁄2 hours. (In a parabolic cooker, stir frequently and cook for less time.) Meanwhile wash the spinach leaves thoroughly, pat dry, then shred into thin strips. Add spinach, salt and pepper, and simmer for another 20 minutes (less time for a parabolic).
Creamy Potato Soup
Suitable for all cookers, and sunny weather conditions
1st Place Middle Division, 2013
1 lb Yukon potatoes (smaller ones are best) 2 packages pre-cooked bacon, crumbled
1 Tablespoon butter
1 cup green onions, sliced
1 can (10 1⁄2 oz) chicken broth
2 cups water
1⁄2 cup instant mashed potato granules 2 cups Gruyere cheese, finely grated 1⁄2 teaspoon salt
1/4 teaspoon pepper
2 cups heavy cream
Bake potatoes in cooker until tender (Box cooker – place potatoes directly in cooker; Panel cooker – put in pot and high temperature bag; Parabolic – put in covered pot with 1/4″ water).
Cut into small cubes and set aside. Melt butter, add onions and one package bacon crumbles. Place in cooker until onion is tender. Add chicken broth and water, bring to boil. Remove from cooker and gradually stir in instant potatoes, blending until smooth. Add salt, pepper, cheese and reserved baked potatoes; stir. Place back in cooker until cheese is melted. Stir in cream. Serve garnished with bacon crumbles.
All-American French Cassoulet
Suitable for box and panel cookers, and sunny weather conditions
1st Place Middle School Division, 2009
1 can (15 oz) great northern white beans, or cannelini beans 1 lb lamb, cut in 3/4″ pieces
1 lb beef rib meat, cut off the bone, cut in 3/4″ pieces
1 lb thick cut hickory smoked bacon
1 lb garlic & herb flavored sausage, cut in 1″ pieces
1 bouquet garni with any of your favorite fresh herbs (team used fresh sage and thyme) 1 cup grape tomatoes, cut in half
1 cup carrots, cut small
4 – 5 cloves garlic, minced
1 can beef gravy
Finishing salt
10 – 12 homemade crostini for garnish
Sage leaves for garnish
Precook (or use parabolic): Pan sear all sides of the lamb and beef. Do not cook meat–meat will fully cook in the box or panel cooker to release flavor into the sauce.
Layer in a casserole dish–beans, garlic, bouquet garni, carrots and tomatoes. Then place all meats on top except the bacon. Place casserole in solar cooker. Cook in solar cooker for 3 hours. Cook bacon separately in solar cooker, then drain and chop. When serving, remove bouquet garni. Garnish each plate with finishing salt, then spoon cassoulet on top. Sprinkle with bacon and garnish with a crostini on the corner of each plate and a sage leaf on the side.
Baked Tilapia with Coconut-Cilantro Sauce
Suitable for box cookers, and sunny or partly cloudy weather conditions
1st Place High School Division, 2013
Canola oil spray
(4) 6 oz pieces tilapia filet
1/4 teaspoon kosher salt, plus more for seasoning 1⁄2 cup light reduced-fat coconut milk
1⁄2 cup cilantro leaves, plus more for garnish
1 teaspoon peeled, chopped fresh ginger
1⁄2 teaspoon garam masala
2 garlic cloves
1⁄2 jalapeno pepper, seeded and chopped
Spray a baking pan with oil spray. Place fish in pan and sprinkle with salt and pepper. Combine coconut milk and remaining ingredients in a blender and pulse until fairly smooth. Pour the coconut mixture over the fish. Bake until the fish is just opaque in the center, about 15 minutes. Garnish with more cilantro and serve. (Note: Garam masala is a popular spice from India. It is available at specialty stores and some grocery stores.)
Mahi Mahi Soft Tacos
Suitable for parabolic cookers, and sunny or lightly cloudy weather conditions
1st Place High School Division, 2012
4 mahi-mahi filets
2 Tablespoons butter, melted
1 1⁄2 cups tomato, chopped
1/4 cup red onion, finely chopped 1 jalepeno, finely chopped
3 cloves garlic, minced
Juice of 1⁄2 lime
1⁄2 head lettuce, chopped
8 flour tortillas
Grill fish on both sides, brushing with butter (approx. 20 minutes). Combine tomatoes, onion, jalapeno, garlic and lime. When fish is done in the center, flake with a fork. Set aside and keep warm. Lightly grill the tortillas in a cast iron skillet until they are warm and brown. Layer fish, lettuce, and pico de gallo on tortilla. Roll.
Lemon Cupcakes with Strawberries
Suitable for box cookers, and sunny weather conditions
1/4 cup softened butter Heaping 1/4 cup sugar Rind of 1/4 lemon, grated 1 egg
1⁄2 teaspoon vanilla extract 1⁄2 cup flour
1⁄2 Tablespoon milk
1⁄2 cup sliced strawberries Whipped cream
Orange slices for garnish
1st Place Elementary Division, 2014
Combine butter, sugar and lemon rind. Mix well with a wooden spoon until fluffy. Gradually beat in egg and vanilla. Mix in flour until combined. Add milk and mix well. Cupcake batter should have a smooth consistency. Cook for 40 – 45 minutes. Let cupcakes cool. Cut the cupcakes in half (horizontally) and sandwich the strawberry slices with a dollop of whipped cream in between the cupcake layers. Top cupcake with whipped cream. Garnish plate with strawberry slices and orange slice. Enjoy!
Chocolate Bread Pudding
Suitable for box cookers, and sunny or lightly cloudy weather conditions
1st Place Middle School Division, 2013
4 large stale chocolate muffins, broken into small pieces 2 cups cream
4 eggs
2 Tablespoons butter
6 large strawberries, washed and dried 1 cup melting chocolate
Whipped cream
1⁄2 cup strawberry preserves
1 teaspoon honey
Set up oven and let it preheat. Meanwhile, slightly beat eggs and cream in a bowl. Blend in muffin pieces and allow to sit for 30 minutes (put in cooler). Butter pan or spray with cooking spray. Put muffin mixture in pan. Cover and bake until set in center (1 – 11⁄2 hours depending on weather). Meanwhile, put chocolate in a small pan and put in oven, let chocolate melt. Dip strawberries into chocolate. Chill on waxed paper in cooler. Place strawberry preserves in another small pan, heat in oven until runny. Add water, stir; add honey, stir. To serve, put a swish of sauce on plate, top with a slice of bread pudding and garnish with chocolate covered strawberry.